Year-end offer: Save 50% on Able2Extract Professional single license purchases before December 31!

5 Creative Ways To Search The Web

Web Search Tips

Searching the web on Google is always the number one go-to solution for finding help online. And although its last update (aka Hummingbird) focused on a smarter way of finding results, it is still possible (and frustrating) to go beyond the third page of your search results. Not a very valuable use of your time.

As productivity advocates, we’re always looking for more efficient ways of doing things—even searching the web.  So for this post we’ll break down some quick basic tips (some of which you may already be doing) when you’re ready to give up on Google.

1. Use Content Specific Search Engines

Helpful when….: You’re looking for a specific type of format.

Why: Google offers a number of search results based on type: news, web pages, images, and file formats. Although Google operators can produce results right down to the file format, there are search engines that can offer efficient searches.

Search Benefits: Content specific search engines will give you a highly focused collection of results in contrast to the endless pages of results from Google. Moreover, they come equipped with search filters that further narrow down your hunt.

Tools: There are a number of handy online tools that can help you search for PDF documents, PowerPoint presentations online, or archived webpages. Also, you can find search tools for photos and even third party tools for searching through Flickr.

2. Search By Finding Similar Sites

Search For Similar Images Photo Credit: therichbrooks via photopin cc

Helpful when…: You want to familiarize yourself with a new subject, genre or field.

Why: When you want to learn about something, you’re first step is to find information on the topic and then find websites that cover the subject. If you’re looking for sites on something like fitness, seeking out influential websites in the industry will give you the lay of the land, connecting you to other authoritative sources in that niche.

Search Benefits: When you search like this, your results are pared down to highly related sites instead having to sift through individual articles and web pages.

Tools: Similarsites.com and SimilarWeb.com are a couple of tools that can help you with this type of search. They’re designed to work with thousands of sites that have already been indexed and rated on relevancy by users.

3. Search For Answers By Asking Users

Helpful when….: You have specific questions or only have broad ideas.

Why: When you have a general question your first instinct is to type it out in Google and see what comes up. But when asking a question, you’re looking for general guidance first (“What can I find on this topic?”) or specific information (computer and hardware specs). A better way to finding results is in asking directly in forums, communities, and groups.

Search Benefits: Users in communities and forums can give you one-on-one advice. This beats having to refer to 5 articles on one topic. In addition, you get answers, insights, and hidden details based from personal experience which some general posts may miss.

Tools: Try communities that are active and that attract credible users. Try sites like Quora, for instance, where you get to ask professionals from different industries for their expertise. There are also Google+ communities full of users who are generous with their time and help.

4. Use Social Media, Aggregators & Real Time Search

 Social Media Search

Helpful when…:  You want quick, updated information on a topic.

Why: The power of social media is hard to deny. On social media networks, everyone is sharing a link, comment, or insight on anything and everything–including posts on the topic you’re researching.

Search Benefits: Social networks are extremely powerful with their search features. Searches on popular networks like Google+, Facebook, and Twitter are easily tailored to find posts, users, or hashtags. Using these networks as your search engine, you can zero in on real time posts. In addition, you can get a contextual grasp on any given topic at the moment based on the sentiments of the posters.

Tools: Besides using the social networks themselves, social media aggregators and real time search engines can help. Tools like Alltop and PopURLS will offer you a quick bird’s eye view of current trends. Just type in your search terms and you’re off.

5. Use Websites & Blogs

Helpful when…: You need to find related resources.

Why: When you’re online, you may already have a natural compulsion to click through to other sites from an article you’re reading. Because blogs and websites link out to sites and sources that complement their own content, you can slowly build up a good resource.

Search Benefits: When you consciously practice this as a search method, it could mean that if you start with one quality web site you can find 5 other links that may be helpful. Granted, there are some spammy sites out there. But given that Google has cracked down on bad linking behaviour and has encouraged websites to link to relevant sources in their blog rolls, this type of search method should be a safe bet.

Tools: To find a good quality site to start you off, visit Technorati, the most credible blog directory online.

As an added bonus, you can combine these tips to get even better results. So while Google is the number one tool when it comes to search,  it isn’t the only one you have to resort to!

How To Download And View Wikipedia Offline

The Internet is a great resource. There are tons of ways to find the information you’re searching for. One example, the popular go-to resource: Wikipedia. When you search the Internet for anything, a Wikipedia article is probably one of the first Google results you click on.

But what if you’re in an Internet black hole and need to do some preliminary research? We’re always looking up quick details on vacation destinations, historical events, celebrities, word definitions, and perhaps even PDF conversion.

You’d be hard pressed to find a research source as accessible as Wikipedia without the Internet. Or would you?

In the past, we showed you how to create a PDF file of Wikpedia articles you could take with you. Well, we came across yet another neat solution where you can actually create your own offline version using WikiTaxi.

What is WikiTaxi?

WikiTaxi is an app that lets you download Wikipedia’s database to your computer which you can view, search, and browse offline. According to the project page, it’s a “single-file application” that “does not require a database engine or HTML browser.”

So how does WikiTaxi do it? The app uses Wikipedia’s original database dumps. Data dumps, in general, are outputs of data that are used as a backup. But it can also be used to replicate the database. This is essentially what you’ll be doing with WikiTaxi.

How To Download Your Own Wikipedia

To start getting your own offline Wikipedia, you’ll be downloading a Wikipedia database file and the WikiTaxi application from the Internet. The application has the offline Wikipedia viewer and importer you need. Then you’ll be importing the database file into a WikiTaxi database you can use.

Let’s get started.

*A word of warning: you’ll be dealing with large file sizes. So download times may be slow.

1. Download one of the Wiki backups. Some of the ones recommended on the project’s site:

You can also check the main Wikipedia database download list for yourself. It is updated on a regular basis. So you’ll want to look for the latest version, though you can choose any dated data dump you wish (we used the August 23 version for this tutorial).

It may look complicated, but don’t be intimidated. Zero in on the –pages-articles.xml.bz2 file. Download this file type only.

Wikipedia Database File Selection

2. Once that’s done, download the WikiTaxi app.  You can find the latest download in the upper left hand corner of the project page

3. Extract the WikiTaxi zipped application file to a folder of your choice

4. Once extracted, click on the WikiTaxi_Importer.exe file

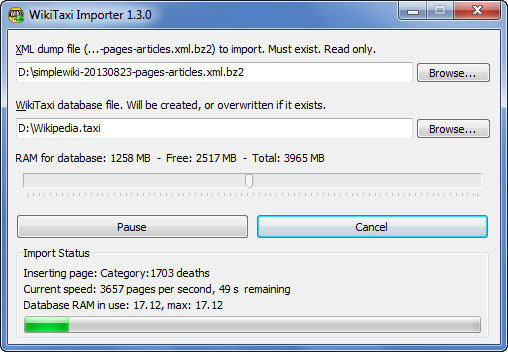
5. In the XML dump file to import section, click on Browse and select the database file you downloaded in step one

6. For the WikiTaxi database file section, click on Browse and select where you want the folder installed. Type in a name for the database to be created, and click on Save

Naming your WikiTaxi Database

7. Click on Import Now!  

Importing a Wikipedia Database

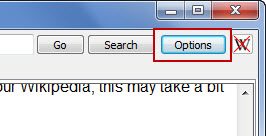
8. Once the import is finished, click on the WikiTaxi.exe in the application file folder. This is your viewer. Click on Options> Open *.taxi Database…

Accessing WikiTaxi Options

Opening the WikiTaxi Database

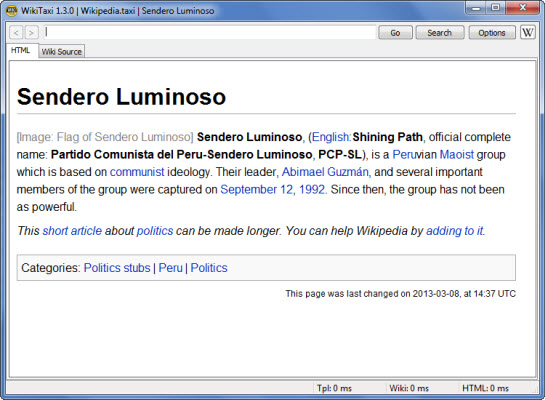
9.  Browse for and select the database file you created (our “Wikipedia.taxi” from step 7). The application will then start at a random page, but you can easily start browsing away from it to other articles.

Viewing Wikipedia Offline

Aside from viewing Wikipedia pages, the application will also let you perform searches, find words in the page you’re viewing, select fonts for better reading, and create a desktop shortcut for quick access.

We always talk about how working on the cloud and over the internet offers a lot of convenience. But WikiTaxi just goes to show that there are ways you can make working without the internet just as convenient too!

Back-To-School Tech Advice: 6 Things Every College Student Should Consider

Studying with Technology

Image credit: Zitona (Flickr.com)

The end of summer is near, and that means students will be heading back into the classroom in a couple of weeks. That being said, it’s time to sit down and think forward about the upcoming school year.

On top of the back-to-school shopping list and registration chaos, it’s a good time to start thinking about how technology will factor into your daily routine.  We’re talking about the nitty-gritty routine spent on studying, researching, writing, and sitting in class.

So in case you haven’t thought about it yet, we’ve hammered out some basic tech advice on 6 things you should consider.

Map Out Personal Tech Support Resources

No matter how well you know your tech tools, there will always be a random issue you can’t fix in a hurry. Knowing where you can go for help is key. There’s only so much Google can do for you with 10 million results.

Do yourself a favour and get your resources mapped out ahead of time.  Scout out, follow, and bookmark a good range of How-To sites, forums, and even basic support pages for your device.

Find Textbooks  Online 

When it comes to textbooks go digital wherever possible.  Digital textbooks can be significantly cheaper than original hardcopy or photocopied versions, and you won’t have to lug around heavy volumes.

As a starting point, sites like Project Gutenberg offer a vast selection of books in a variety of formats. You can also take advantage of Google’s latest textbook rental and purchasing offer from Google Play Books.  There’s also the iBooks app, whose iBookstore offers text books from notable publishers, such as McGraw-Hill and Pearson.

Flatworld Knowledge Online Textbooks

If those don’t pan out, you can check out FlatWorldKnowledge, an online catalog of textbooks where you can personalize textbook content according to your needs.

Shop Around For Free Software

You’re used to hearing of big name software applications like Microsoft Office and Adobe Photoshop that are above your price range.  But you can just as easily get free software that offers the same functionality as other paid programs.

Search for open source software alternatives. There are a ton of free tools out there. You can also find apps for your device like productivity suites, note takers, and mobile converter apps. In addition, desktop suites like OpenOffice and LibreOffice are great alternatives to Microsoft Office you can get for free.

Organize Your Gadgets & Devices By Task 

Mobile Devices
Image credit: sean hobson

If you have more than one device, you should try getting them organized according to task.  You may think this is counter-productive, but different sizes, apps and OSes can actually make working on multiple gadgets inconvenient.

Think about how you’ll be dealing with your school work this year.  Will you be typing up your papers on a laptop in a coffee shop? Does research work better for you on a desktop? Or will you be on a tablet for on-the-go convenience? You get the idea.

Some devices are more practical than others for certain tasks.  Figure out your studying habits and get a gadget strategy and workflow in place.

Adopt Different Study Habits For Online Classes

Some of your courses may be offered online or have an online bulletin board component set.  Keep in mind that online learning environments have different dynamics and hence, need a different approach.

Tip? For starters, keep focused.  It’s all too easy to get distracted with opened browsers, the comfort of your own room, and online networks. Moreover, we’re all used to scanning stuff online.  So when it comes to in-depth reading, you’ll need to really shift gears once you log in. Remember that a lot of it is about independent learning.

Also, timeliness is a big factor that can possibly affect your grades. You want to be one of the first ones to submit a discussion response. Remember there are others who can possibly cover the same points you want to make. Don’t let them steal your thunder by posting it up first. In short, constantly scout out other minor adjustments you can make to your studying habits.

Always Have A Back Up Plan

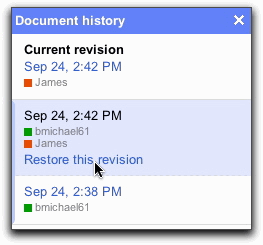
Google Docs Revision History
Image Credit: Support.google.com

All too often does a program crash on us in the middle of a paragraph, a USB gets lost, or we quickly close that 1,500 word paper without saving. But a few things can help prevent that.

Create a copy of your papers every few drafts to different storage media. Use cloud storage services like Dropbox to save a copy of your last draft.

Or conversely, create your original copy online with Google Docs. It will save your changes automatically. In addition, it will create a back up of the file’s revision history. Let’s not forget that you can always send a draft to yourself as an attachment!

Once the year starts, a solid routine will be the only thing keeping you on top of things. So make sure you plan out your tech strategy well!

How To Work More Efficiently On Your Desktop With 4 Simple Tips

Computer Desktop with Shortcuts

Image Credit: Anders Sandberg

We all spend a good part of our time on the computer, and as paperless workers, we’re conditioned to find the fastest way to get things done. But are we ever working as effectively as we could? Probably not.

And it’s not because we don’t try. It’s just that we often overlook the most common place where we can tweak our routines to make them even more efficient. It’s the one place where we all start from: the desktop.

With a few simple changes and customizations, you can eliminate the seconds you spend on extra desktop clicks, searches, and toggling.  Take a look.

Audit Your Shortcuts

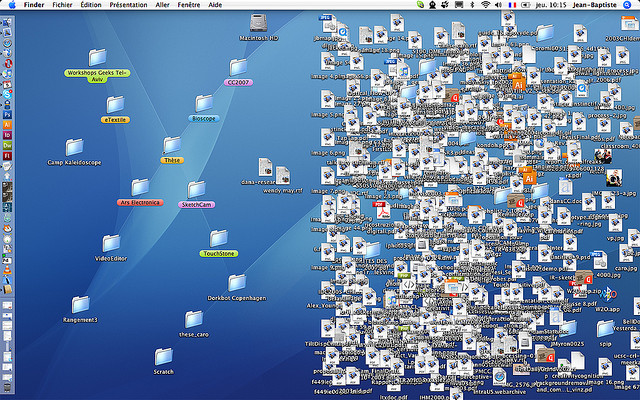
First thing to deal with is icon clutter. Everyone suffers from it. It’s easy to rack up stray shortcuts over time via software installations and quick saves to the desktop. If there are ones that you don’t need on a regular basis, delete them. Shortcuts are only good for tasks or software you access on a daily or weekly basis.

Desktop Shortcut Icons

Image Credit: jeanbaptisteparis

Second, consider the type of shortcuts you create. Ones that help you perform repetitive tasks are the most efficient.  Consider email reports you send on a daily basis. If they all contain the same formatting and the same outline, create a template for it and then generate a desktop shortcut to quickly call it up (right-click on the template file and select “Create Shortcut”). A desktop trick like that can shave minutes off your routine.

Organize Your Desktop(s)

Dexpot Virtual Desktop Thumbnails

Did you know that you don’t have to stick to just one desktop? Dexpot is a handy tool that will let you set up multiple virtual desktops. It’s perfect for anyone working on more than one project at a time. Each desktop is kept separate, but easily accessible via hotkeys, thumbnails and across different monitors, as well.

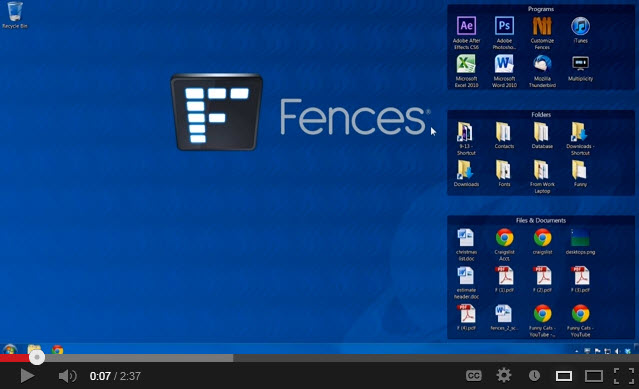
Fences Video Demo

You should also consider putting your desktop real estate to good use. Categorize and organize your icons. Tools like Fences and Nimi Places keep your desktop shortcuts organized into different zones for quick access.  Both tools come with customization features like filtering options that can keep your work area in order at all times.

Or you can take things up a notch by cleaning up your desktop completely.  RocketDock can give you a minimalistic work area by keeping all your favourite shortcuts, folders, and applications in one neat and tidy dock you can easily access when you need it.

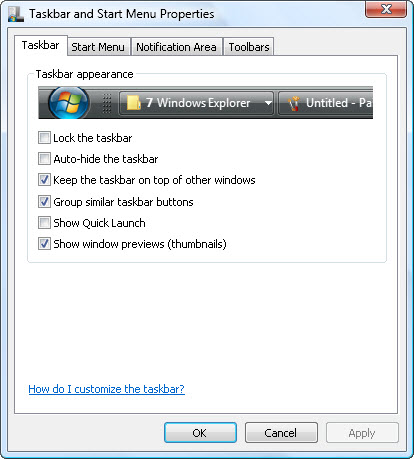
Customizing WindowsTaskbar

Then there’s your Taskbar. You can adjust and customize it through the Control Panel. Auto-hide it, group similar buttons together, or show window preview thumbnails. Make it work with your everyday tasks. For example, if you take a lot of tutorial screenshots, you may want to auto-hide the taskbar completely so you don’t have to crop it out later on.

Customize Your Desktop Wallpaper

A desktop can also be effective in other ways.  Starting on a new task? Create a flow chart or cheatsheet reference image of the process and set it as your wallpaper. Or download a motivational image for those times when you need an extra push. Your desktop can be more than just a dumping ground for shortcuts and files.

Make Programs Instantly Accessible

Having quick access to programs is a necessity. While the desktop allows you to avoid the hitting Start menu button, you can get even more efficient with a desktop app like Launchy. Like its name suggests, it will let you launch applications from it just like you would with the Start button, but it can also launch documents, files, bookmarks, folders and more.
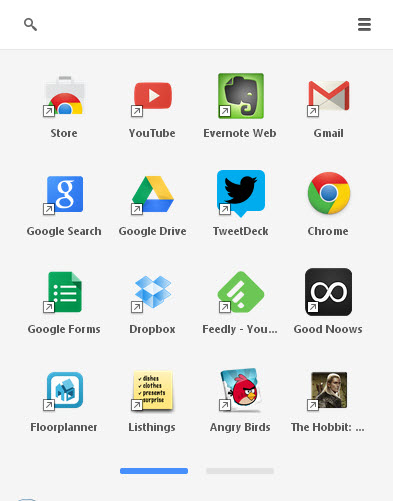
Chrome App Launcher

You can launch your daily web browser apps right from the desktop. Browser apps usually require an opened browser to access them. However, a tool like Chrome App Launcher, will not only let you access Internet based Chrome web apps directly, it will also let you access packaged Chrome apps that “run as separate, standalone software that can also be used offline, unlike traditional browsers,” according to PCWorld’s review.

It may seem like an insignificant thing to reorganize your desktop. You may even think that small details like desktop shortcuts won’t matter. But it’s the little things that add up. So keep your desktop in order. It can either make or break your productivity!

How To Export Open Office Files To Google Docs

Working via the cloud is unavoidable these days. Thanks to mobile devices, we’re finding more efficient ways of working while away from the office.  In fact, a common productivity habit these days is to send the document you’re working on to Google Docs so you can edit them from anywhere.

Well, if you’re using Open Office to create those documents, we’ve got a great productivity tip for you. In addition to helping you convert PDF to Open Office, we came across an Open Office extension that will let you instantly export your Open Office files to Google Docs: OpenOffice.org2GoogleDocs (OOo2GD).

OpenOffice.org2Google Docs is an extremely handy plug in that allows you to export, import and update your Writer, Calc, and Impress files to and from Google Docs.

The best part about this extension is that it simplifies the entire process and lets you do it right from within the Open Office suite itself. Take a look.

Installing OpenOffice.org2GoogleDocs

To start exporting your files, you’ll obviously need to install the plug in first.  To do so, follow these steps:

1. Download the OOo2GD extension by clicking on the Get it Now button. Save the extension to a location you will remember.

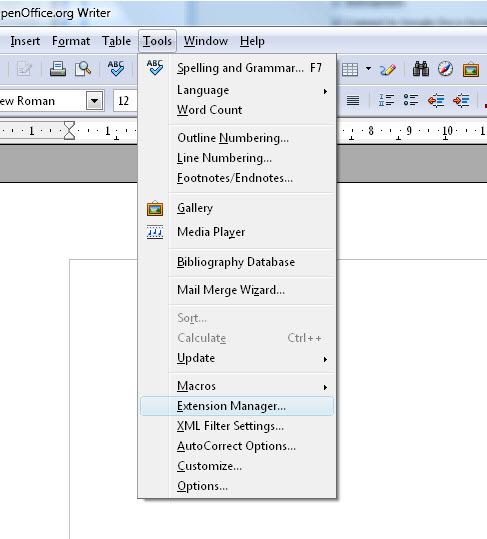
2. In Open Office Writer, go to Tools>Extension Manager…

Accessing OpenOffice Extension Manager

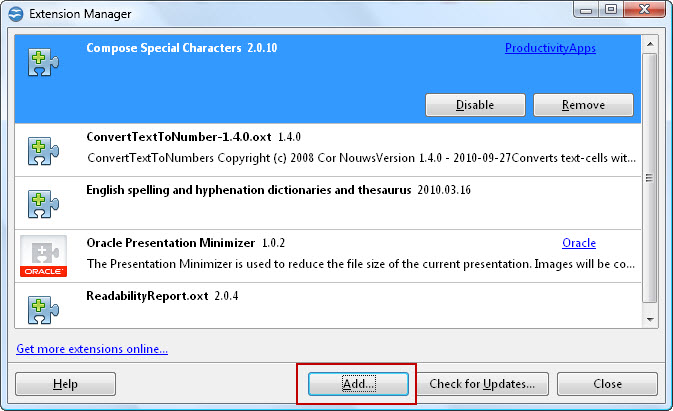
3. In the Extension dialog, click on Add. Then browse, locate and select the OOo2GD extension you saved in step 1.

Adding OpenOffice Extensions

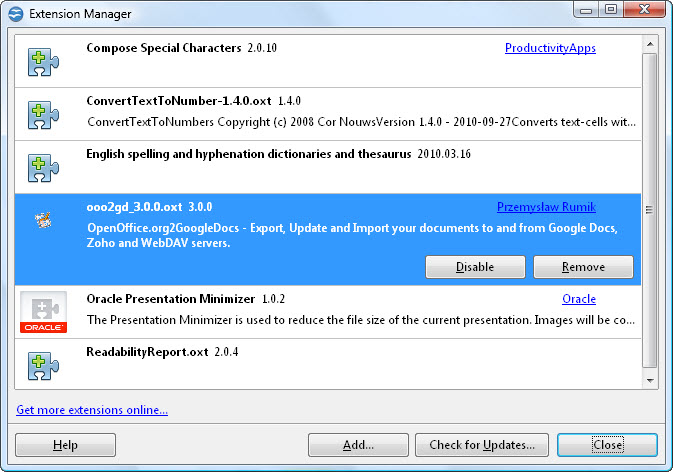
Once installed you should see it enabled in the extension list:

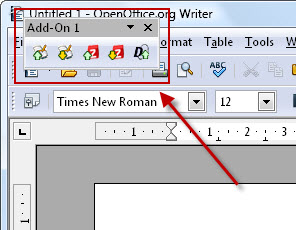
OOo2GD Toolbar AddOn

4. Restart Open Office. You’ll find the OOo2GD Add-On ready for you to add to your regular toolbar for quick one-click access to the functionality. Place it on your toolbar by clicking and dragging it to an empty spot on your toolbar.

OOo2GD Toolbar AddOn

Note: This is toolbar is optional. You can also access the functionality via File > Google Docs & Zoho.

How To Export Your Open Office Files to Google Docs

Now that you have the extension installed, you’re ready to start exporting your files to Google Docs. We put a quick step-by-step tutorial to help guide you through the process. To export your Open Office document,

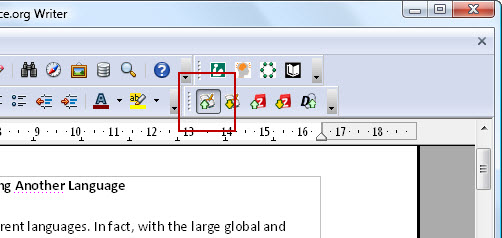
1. Open the file you wish to export and click on the Export to Google Docs button:

Exporting OpenOffice to GoogleDocs

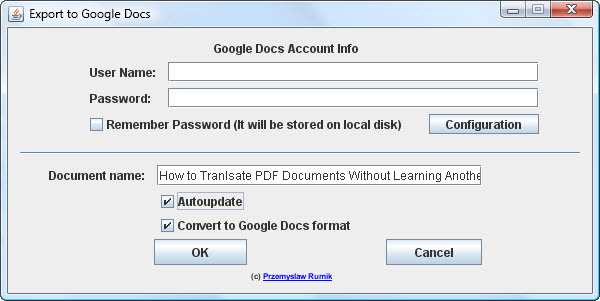
2. In the pop up dialog, enter your Google Docs Account credentials

Entering GoogleDocs Credentials

3. Select Convert to Google Docs format and Autoupdate. This will allow you to automatically set your file up for syncing and editing within Google Docs.

4. Click on OK.  OOo2GD will then start uploading your file to your Google Drive.

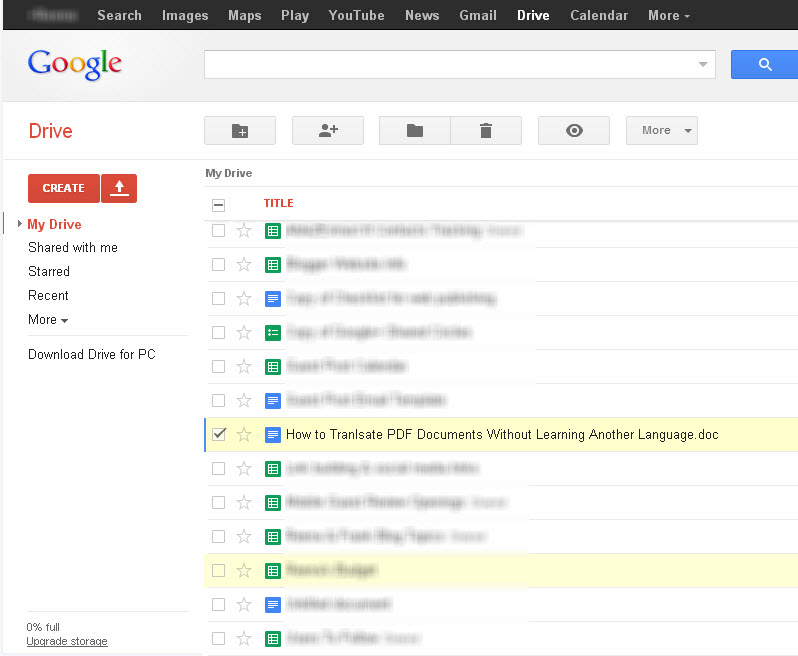
5. Sign into your Google Drive account and locate the file

OpenOffice file in GoogleDrive

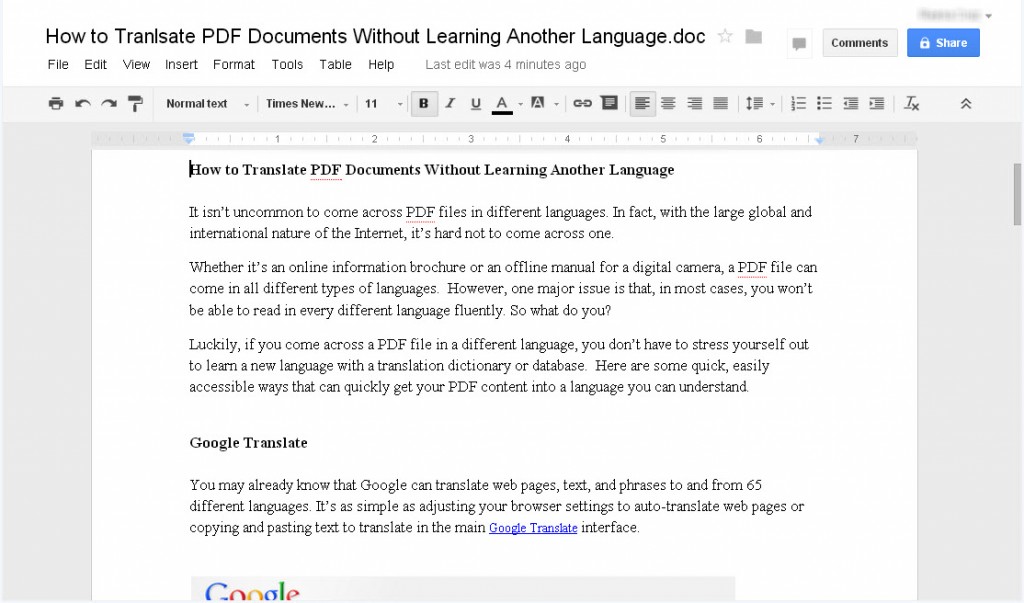
6. Click to open the file and you can then edit the document as needed within Google Docs

Editing OpenOffice in GoogleDocs

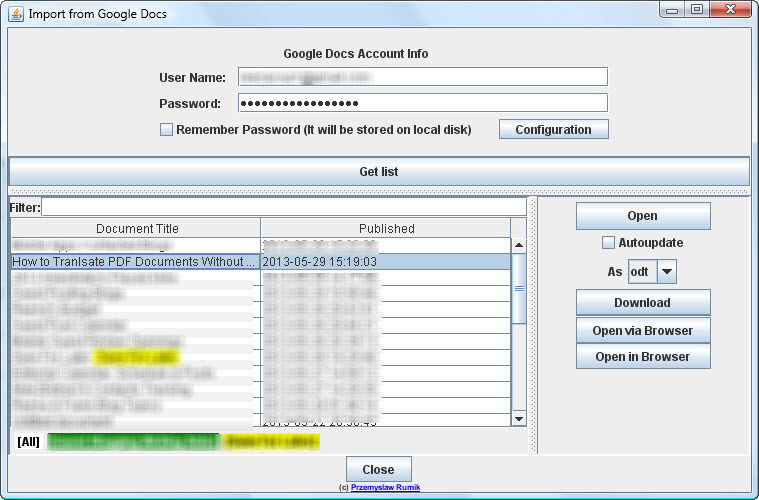
You can also quickly import Google Docs into Open Office in a similar manner. After clicking on Import to Google Docs, just input your credentials, click on Get list and you can select which file you want imported. Click on Open. 

Importing GoogleDocs to OpenOffice

This extension is perfect and convenient for worker bees who need to take their work home with them. It eliminates the hassle of a USB key and toggling back and forth between saved copies.  Do you have a favourite OpenOffice extension yourself? Which one helps you out the most?