How to Password Protect a PDF (Step-By-Step Guide for 2016)

Right now, there are more than 2.4 billion PDF documents roaming the world wide web.

This means that we are slowly, but surely heading towards a major digital milestone– one PDF per person. However, as  the PDF gets closer and closer to this superstardom status, it means we need to take our document security seriously and take charge of who gets to see our information.

When you password protect a PDF, you are in full control. You are the puppet master of that document and you decide who gets permission to view, edit and manipulate your work. Do not mistake that with being selfish.

There is a justified reason why people of all professions should consider encrypting PDF documents when transferring important files.

For example, an accountant may often correspond with his or her clients via email. If there’s an unprotected report in that communication, and it contains particularly sensitive information then it’s at huge risk of being stolen or misplaced. And that’s why it’s always smart to password protect your PDF.

The big question is: how do we go about it?

Well, it all comes down to your workflow. We brainstormed some common scenarios when you’d want to perform this particular task:

  • You want create a password protected PDF from other file formats
  • You have a ready PDF that you just need to encrypt and save

Let’s go to work.

Creating Encrypted PDFs From Other File Formats

We’re starting with the most common way of encrypting PDF files and we’re going to walk you through two options:

  • Create an encrypted PDF straight from MS Office (does not work with MS Excel)
  • Create an encrypted PDF document using a PDF creation software (works with all file formats)

Creating Encrypted PDF Straight From MS Office

If you need to password protect an Excel document while printing it to PDF, then go to the next chapter where we discuss that particular task.

If you would like to print a Word document to PDF and add password protection, then just follow the steps below:

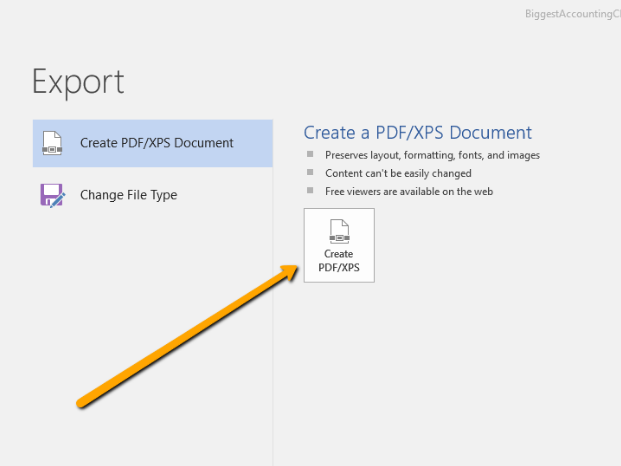
1) Go to File > Export
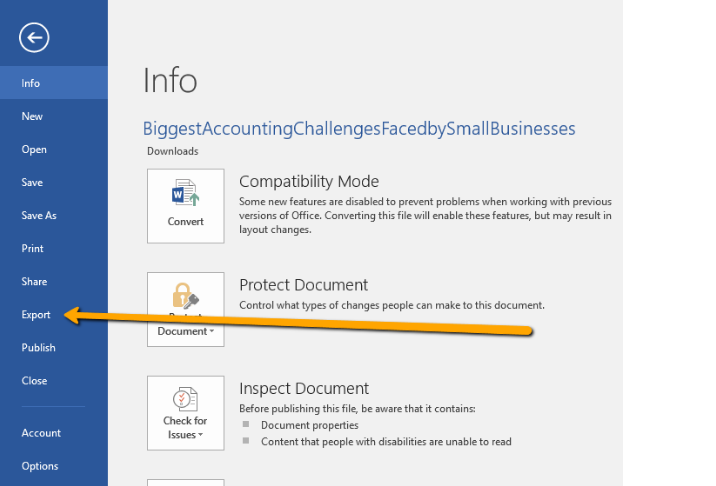
Exporting PDF MS Word

2) Create PDF/XPS document

Create PDF In MS Word

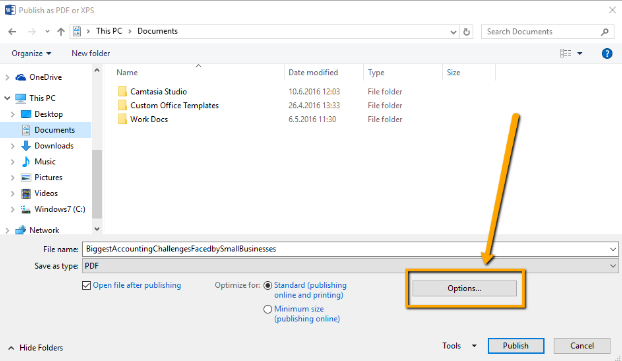
3) Click on Options

PDF Creation Options In MS Word

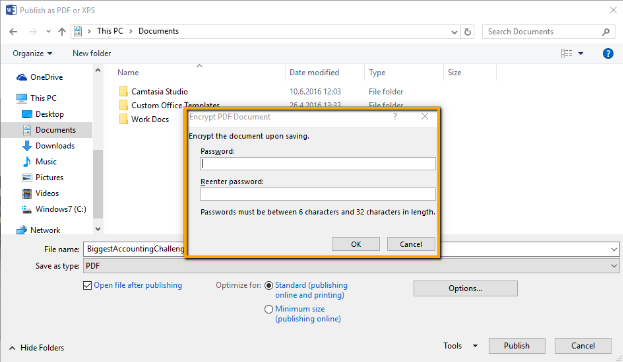
4)  Check “Encrypt the document with a password”
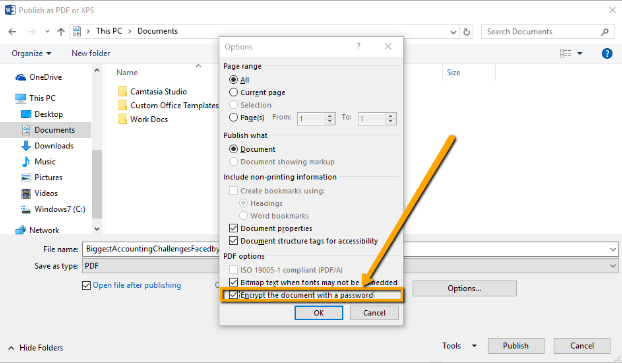
MS Password Encryption Option

5) Enter the password and hit OK

Encrypting PDFs In MS Word

Job done. You‘ve now successfully created a password protected PDF out of MS Word. But what about other file formats?

Creating Encrypted PDF Documents Using PDF Creation Software

You can use a variety of PDF creation software to print an encrypted PDF document from other applications. For this tutorial we are going to use our very own Able2Extract. You can download the free trial and follow along:

1) Open Able2Extract and go to View >PDF Creation Options
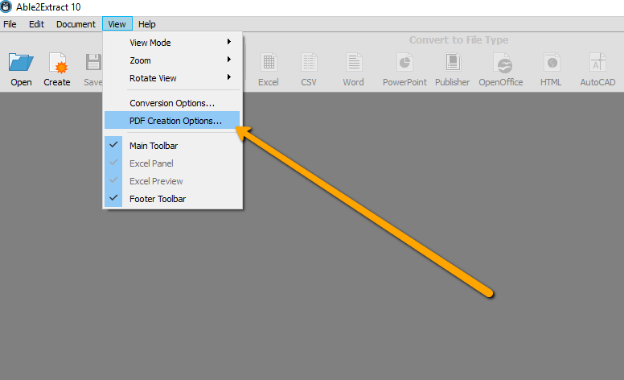
Accessing Able2Extract PDF Creation Options

2) Security > Check the Secure PDF and enter the User and Owner names. The  User field will be your password. Set up the desired permissions and click OK.
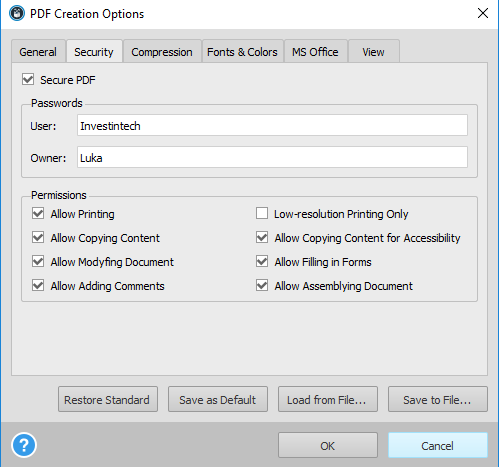
PDF Security Dialog

3) Go to Create PDF > open your file (you can create PDF out of all printable formats)

Selecting Able2Extract Create PDF Icon

4) The tool will print your file to PDF and automatically apply the security settings you just added.

Able2Extract PDF Creation Progress Bar

The only thing remaining is to save it back to PDF and you’re done. Everything clear? Let’s move on to the next part.

Adding Password to an Existing PDF

You can add a password to an existing PDF in a variety of ways, but the main choice you will have to make is whether you’re going to do it on your desktop or online.

I would suggest sticking to your desktop when working with bigger documents and possibly using an online tool if you’re handling a PDF with a smaller file size.

However, there’s no escaping the fact that, whatever the size of your PDF file, you may be thinking of encrypting it. This further implies that document security is your utmost priority, which means that you should probably stick with a desktop tool. If you have already downloaded Able2Extract then this will also be a walk in the park.

1) Open your unencrypted PDF in Able2Extract, select all and convert it to its corresponding format. If it’s a PDF with textual  content  then convert it to Word, if not you can choose between the other file formats available.
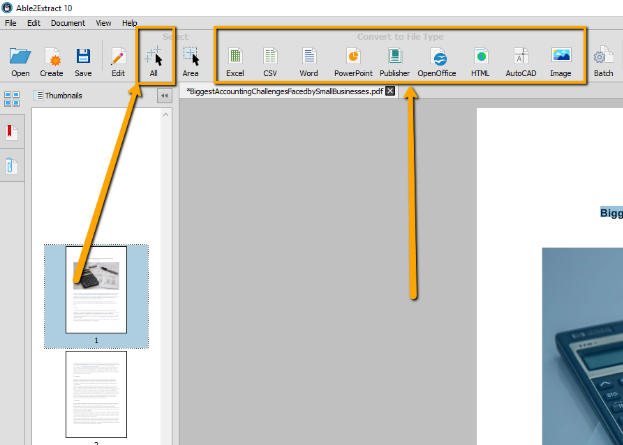
Selecting Able2Extract Conversion Selection Options

2) Your converted file will automatically open. Now, just follow the steps below to apply password protection from your MS Office application:

a) Go to File > Export

b) Create PDF > Options > Encrypt the Document

Once again, if you’re trying to create a PDF from Excel and add a password to it,  know that it can’t be done in this way — go back to the part where we explain how to create a password protected PDF using software.

BONUS: How to Add Password to a Scanned PDF File

Once in awhile, we may come across with a scanned PDF document. What makes scanned PDFs so difficult to work with is that they are essentially images with a .pdf extension, so they can’t be rendered by your regular file editing application.

What we can do in such instances is use Able2Extract Professional, which has integrated OCR (Optical Character Recognition) technology. To apply password protection on a scanned PDF:

  1. Open the PDF in Able2Extract Professional
  2. Convert the scanned document to your file format of choice
  3. Apply the password protection steps from the tutorials above

So, there you go guys, some actionable tips on how to secure your document and ensure that your work is traveling safely.

Did this tutorial help you? Share it and spread the love. Leave your questions in the comments below.

How To Create A PDF Portfolio From Your Instagram Photos

Viewing Instagram On Laptop

Instagram selfies are all the rage these days. The app has helped users (and celebrities) produce some of the most widely shared pictures on the web.

Who doesn’t like to take a fun pic when they’re out and about or when a memorable family moment crops up?

Yet for some, Instagram is a professional tool. From graphic designers and photographers to online entrepreneurs and real estate agents, Instagram is an extremely effective platform for marketing and spreading the word visually about what they have to offer.

Whether you have photos of your workspace, products or digital work, a PDF portfolio of your best Instagram shots is a super easy way to enhance your professional pitch and drum up some business. Here’s how.

1. Download Instagram Photos With DInstagram

The first thing to do is download your Instagram photos. DInstagram is a Chrome extension that allows you to download individual Instagram photos.  To do this:

a) Install the extension on Chrome.

b) Log into your Instagram account (this will also work if you aren’t logged in and are viewing your account’s photos, too).

c) Click on the photo you want to download.

d) In the upper right hand corner, click on the DInstagram Select your format (choose either PNG or JPG). Select the image size (Big, Medium, Small). Click on Download.

Downloading Instagram Image

e) Save the photos onto your computer. Tip: create a new single folder for all your photos for easy access.

2. Convert Your Instagram Photos To PDF

The next step is actually getting those photos into the PDF format. This is where Able2Extract 10 comes in handy.

a) Open Able2Extract 10.

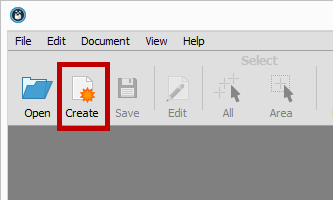
b) Click on the Create icon in the toolbar.

Creating PDF In Able2Extract

c) Select your image files. Able2Extract 10 will let you quickly open a number of images simultaneously just by selecting multiple files at once. Click on Open.

Opening Images In Able2Extract

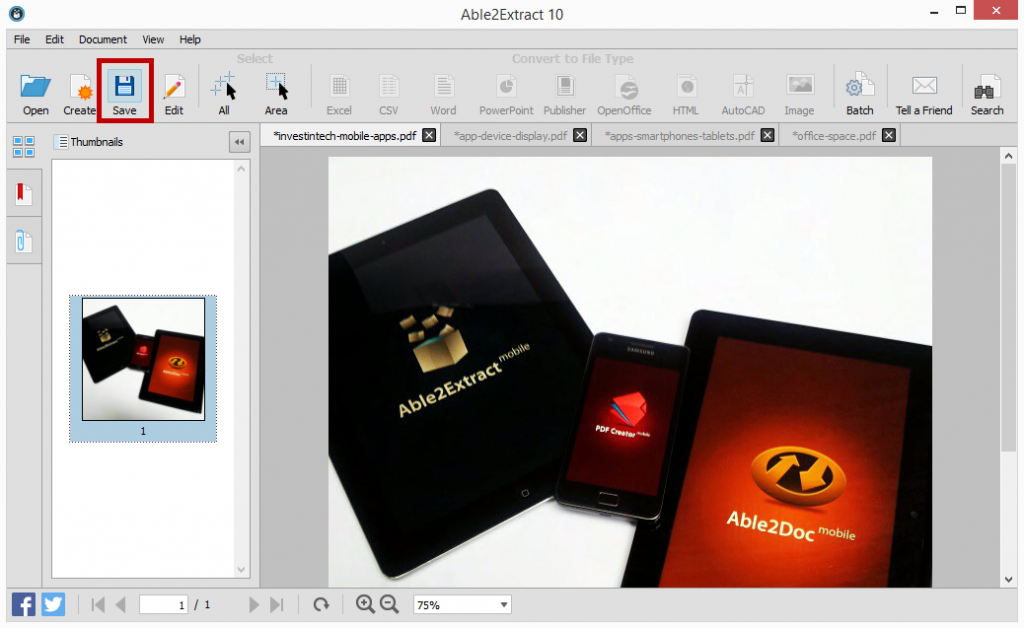
d) In each tab, click on Save.

Saving Images As PDF

Tip: Just as you did previously, create a new folder for all the PDFs you will be creating. This will give you a place to export any other future Instagram shots in PDF you may want to include when you update your portfolio.

3. Merge Your PDFs Into One

Now that you have all your image files saved as a PDF, you can start putting them together into one PDF file. You can continue on from Able2Extract. No need to exit the application. You can close off all but one of the tabs.

In that one tab you have left opened,

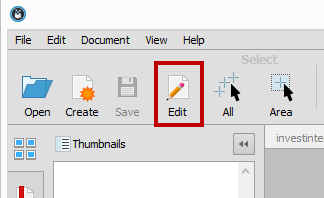
a) Click on the Edit icon from the toolbar. This is the file from which you will be creating your PDF portfolio. You can rename the file later on as needed; no need to worry about that just yet.

Editing PDFs In Able2Extract

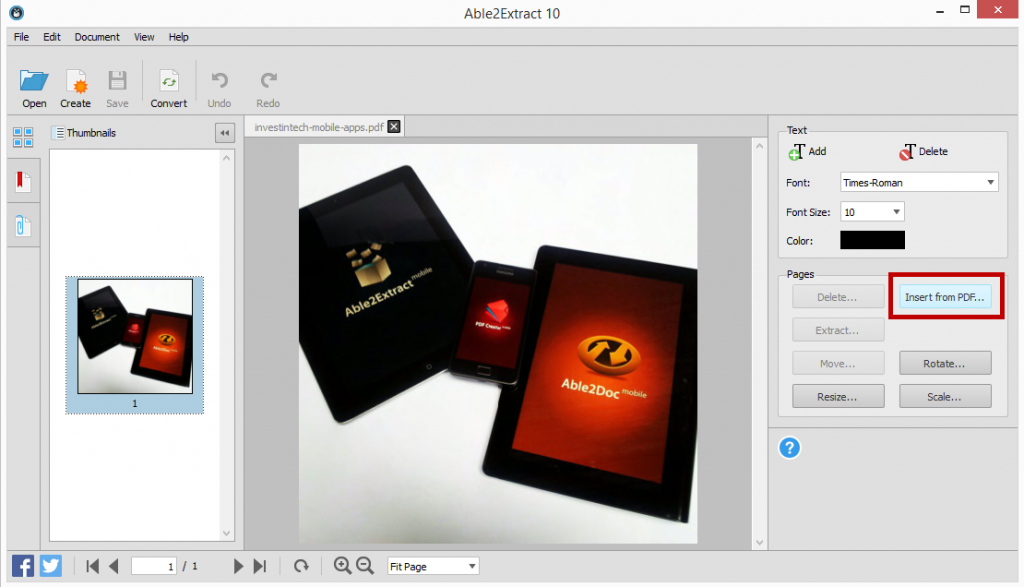
b) Click on the Insert from PDF… option in the Editing panel. One by one, you can add your newly created PDFs to the file by selecting it and clicking on Open.

Inserting Pages Into PDF

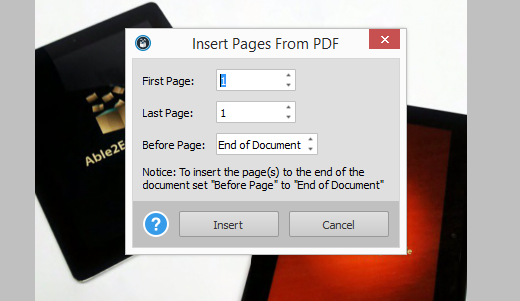
In the pop up dialog, leave the value in both page fields to 1 (it will be the first and last page you insert). You can decide the order of your images by using the Before Page field:

Merging PDF Pages Together

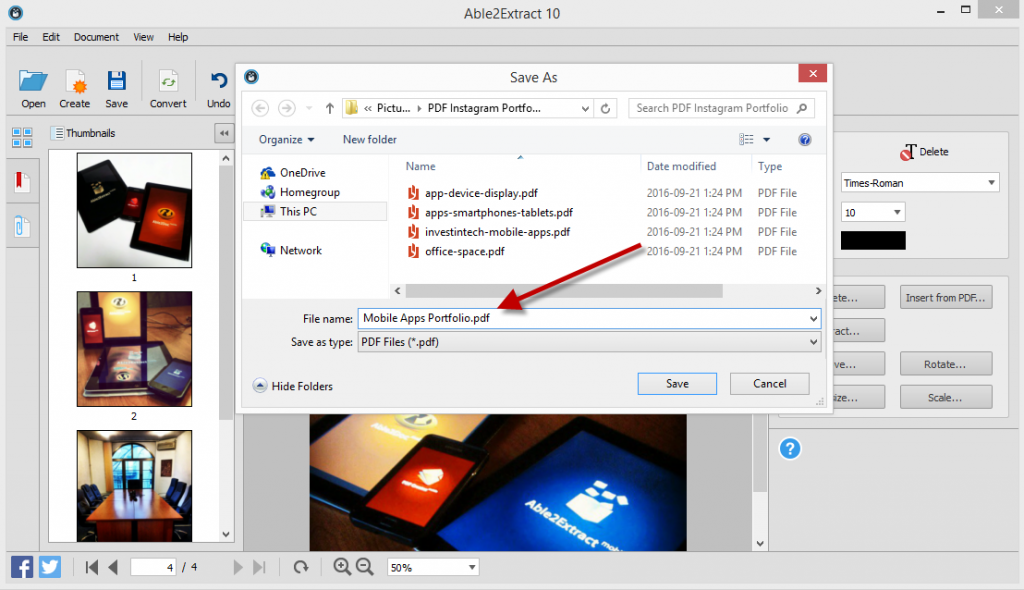
c) Once all your PDF photos are inserted, click on the Save icon once again. Or as mentioned above, you can rename the file by going to File > Save As… and renaming your file.

Renaming PDF In Able2Extract

The final result? A professional looking PDF portfolio made from some of your best images:

Viewing PDF Portfolio In Able2Extract

You can repeat the above steps in this third section to get other PDF content into the portfolio for a complete look. Add a title page, PDF pages with company information, a section on your services, testimonials from clients or even add a page with a list of publications that have featured your products.

How effective your portfolio becomes is up to you, so show off your best stuff!

Get Ready For March Madness With Able2Extract 10

Basketball Slam Dunk

Microsoft Excel can be intimidating. True.  But a big pro is that it can be a life saver when wrestling with numbers and data.

Now, if you’re asking yourself when in the world would you have to deal with numbers and data, we have two words for you: March Madness.

March Madness 2016 is almost here and you can bet that everyone who doesn’t (or does) deal with data will be wading in conference standings and school stats over the next few weeks.

If you’re running a March Madness pool for your office, using MS Excel will be the best way to analyze, track and digest all the information you need to fill out your brackets and keep your pool in order.

Yet that’s only half the battle. The other half is getting that data into Excel. And this is where Able2Extact 10 can help you get everything in order.

Transfer Any March Madness Data To Excel

In Excel, you can streamline and combine any existing data you want to keep as reference or update as the tournament goes on.

Player and team data will usually be available in a downloadable PDF. But what if you have a Word file? A PowerPoint presentation? No worries.

You can get your March Madness data into Excel spreadsheets regardless of the format you have. Just open your file in Able2Extract 10 and select the content you want converted (a page, line or the entire file). Then simply click on the Convert to Excel command on toolbar.

Easily Convert Complex Team Information With A Few Settings

There are a lot of pain points associated with dealing with data when managing a pool—or several, one of them being the many different formats you have to consolidate and analyze. If you have differently formatted tables or statistical charts spanning pages, it can be a nightmare.

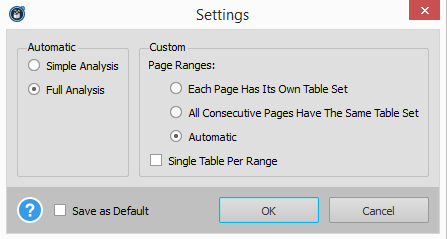
Good news is that you can tailor a PDF to Excel conversion according to the table structures in your file. Able2Extract has a few PDF to Excel conversion settings that make the job easier to identify and deal with the source document’s table structure. Select your settings before you make the conversion and you’re good to go.

Able2Extract Excel Conversion Settings

Customize Your Data Extractions Into Excel

You may also need specific data extractions for analyzing detailed statistics. For example, you may want to eliminate the data for lower seeded teams or scrape only the data from top teams in the last year to create your own shortlist.

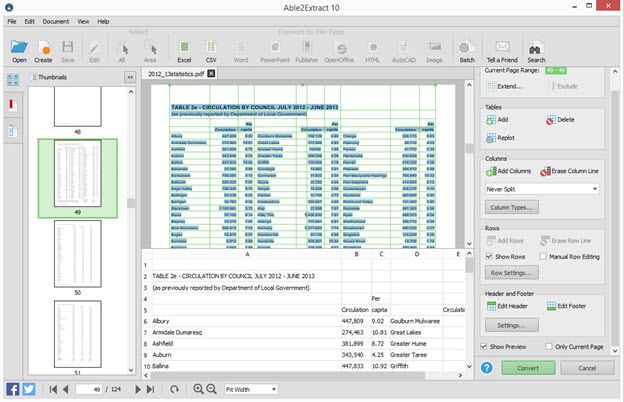
For this, you can simply perform a Custom PDF to Excel conversion and filter out that information even before you even hit the Convert button. You can move rows, columns and even preview your conversion results to see if you have all the numbers you need in the right place.

Able2Extract Custom Conversion Interface

Convert March Madness Statistics In PDF to CSV

Which team you root for depends just as much on the numbers as it does on a team’s dynamics. But we’re talking about 68 Division I college teams plus stats on individual players, coaches and so on. That’s a lot of data!

It, thus, may be worthwhile to have database tools for March Madness. Or, if you’re tech savvy enough, you may have a tool or script that can crunch the numbers to predict the perfect March Madness bracket.

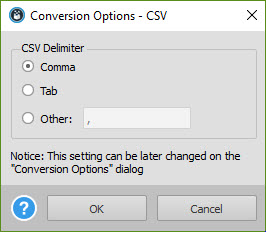
Able2Extract-CSV-Conversion-Option

In either case, you can get your March Madness PDF data into raw .CSV or delimited formats.  Just click on the Convert to CSV command in Able2Extract. It’ll get your data working with the databases and tools you already have in place.

Organize Your Data According To Worksheets

In some instances, you may have PDF data on teams all lumped into one single PDF with each team on one page or separate categories of data on each page.

It’s convenient for distributing and consuming the information, but hardly so if you want to separate that data. For instance, if you end up wanting to analyze each of the Final Four teams separately, you may want to organize and record each team’s information into separate worksheets.

Excel Single Worksheet Option

Now, you can go into your spreadsheet and move all your data around via copy-paste. But an easier way is to uncheck the Single Worksheet option in Able2Extract’s Excel/CSV Conversion Options before you make your conversion.

This will automatically convert each PDF page into a separate worksheet, saving you the hassle of doing it manually.

No matter what type of pool your group decides to set up, knowing your stats is essential. Whether it be analyzing wins, losses and odds or keeping track of results and pool entries, Excel will be your best bet. The key is getting that data set up properly for analysis. Hopefully a few of the tips above helped!

So with March Madness just around the corner, how are you filling out your brackets this year?

Top Excel Tips For Data Analysts

Top Excel Tips For Data Analysts

It’s an obvious, well-known fact that data and business go hand in hand. You can’t manage one without affecting the other. And whether you’re analyzing a client’s data or using your company’s data to make executive decisions, your tools have to be able to handle the tasks you perform with that information.

For instance, if youre a data analyst, most of the time you go through these stages of data analysis:

  1. Data Cleaning: Transform and rearrange the data in a way suitable for data analysis
  2. Data Analysis: Perform the necessary calculations to extract useful information
  3. Data Visualization: Use graphs or other type of visualization technique to show your results

While these may be impossible to handle manually, they’re perfectly manageable with Microsoft Excel. The application is advanced yet user friendly enough for the average user.

However, the tricky part you probably struggle with is knowing how to access and apply the right functionalities to your data. Well, it’s time to stop the struggle.

In this post, I’ll show you some Excel tips you can use at each of the data analysis stages.  Click through to jump to a specific section or tip.

Continue reading →

Exploring Document Management Needs For Insurance Companies

Document management in the insurance industry is important. Clients submit documents in a number of different methods and formats. As such, insurance companies need to be prepared to handle any type at any time, whether paper-based or electronic.

However, with PDF files being the de facto standard for document submission, insurance companies can expect to deal with high volumes of digitized data. This means being able to handle, process, and store those files.

Document Management Folders

Despite this obvious fact, some insurance companies are still hesitant to invest in document management software or individual tools. But for some companies, the onslaught of data and documents that need analysis is pushing them forwards, forcing them to explore their options.

Insurancenewsnet.com, in fact, provides a timeless guide for companies who need to start thinking about it and make sound decisions in choosing a document management software tool.

How To Start Your Search For Document Management Tools

To start, there are a few main questions you should keep in mind: How easy is scanning? How are documents organized? Are documents editable?

These are essential questions to think about. For instance, as you get into analyzing those documents, editability will determine the tools you use and the work you perform.  Not only that, but it will determine the time spent on working to convert the data from one format to another.

Document organization determines how efficient you’ll be–how do you store, name and retrieve files later on? 

With paper-based workflows still largely in existence among clients and third parties, you can expect many setbacks before that data is even ready to be digitally processed and analyzed. How can you get them quickly into an electronic format?

Struggling With Extracting Data From PDF Documents

As a case in point, one insurance company, AgencyOne, struggled especially with making the data they received in PDF files editable. But dealing with PDF files without a specific tool in place affected their efficiency as an insurance company, an issue not uncommon in the industry.

“It was frustrating that I could find no way to speed up the process of data extraction or take real advantage of the import capabilities,” says Alexandra Smolen, Commission Specialist at AgencyOne. “It used to take me all week to get my work done auditing commission statements.”

AgencyOne Commission Specialist

Finding The Key To Improving Document Workflows

They struggled with PDF files and, later on, found success with data extraction using Able2Extract Professional. The benefits the company experienced include:

  • 3x increase in efficiency
  • Time previously wasted was converted into time spent on strategic activities
  • Affordable for company budget
  • Week-long data extraction tasks turned into a few days’ work
  • Increase in productivity led to an employee’s raise in wage

Without doubt, insurance companies need to start looking at document management solutions. As technology becomes more and more advanced, things such as electronic submissions will quickly become the basic standard. The key to tackling the new digital document age is to make sure your insurace company stays one step ahead of the game.  

Read the full AgencyOne case study here for inspiration on how you can get your own insurance company’s workflow up to speed.