Year-end offer: Save 50% on Able2Extract Professional single license purchases before December 31!

How to Create Your Own Customized Tab In Microsoft Word 2013

No doubt that when you create a Microsoft Word document, you have one or two tools that you always use. But if those tools span a wide range of functionality, they’ll be scattered across the ribbon, forcing you to click and toggle between tabs and bury it back into the Ribbon every time.

To solve this issue, you can customize the Quick Access Toolbar and even create a few shortcuts for your formatting functions. But why not take your productivity even further and create your own tab?

You can easily get your most commonly used functions on one single tab in Microsoft Word 2013. This way every command you need is right at your fingertips without having to go back and forth between different tabs. Here’s how.

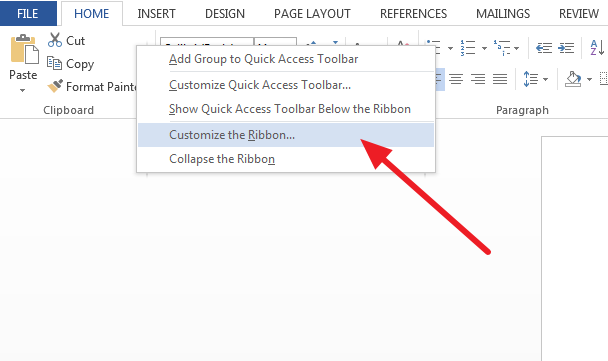
1. Right click on any tab and select Customize the Ribbon.

Customizing the Ribbon

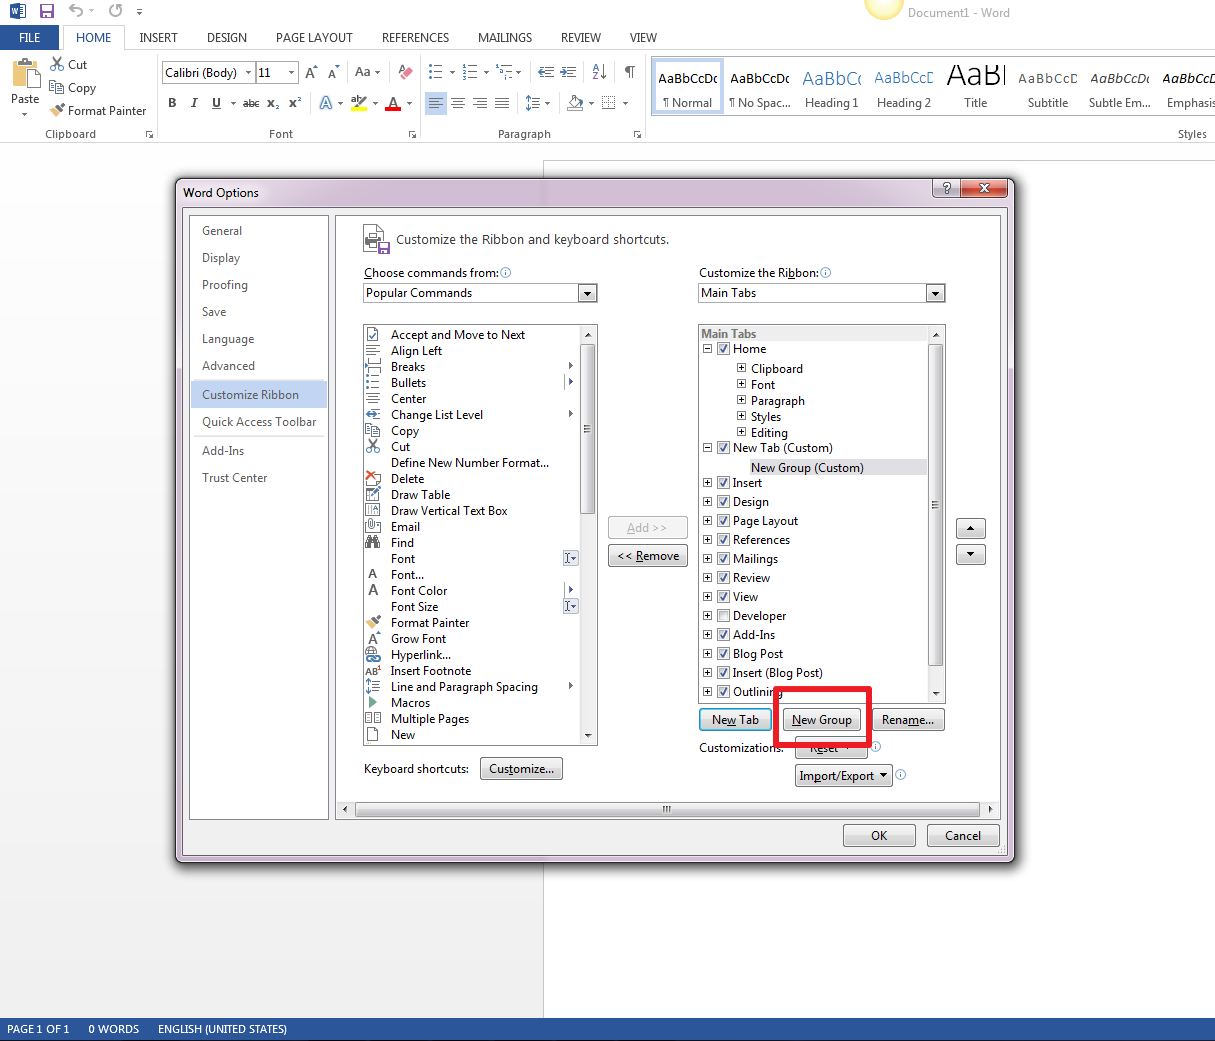
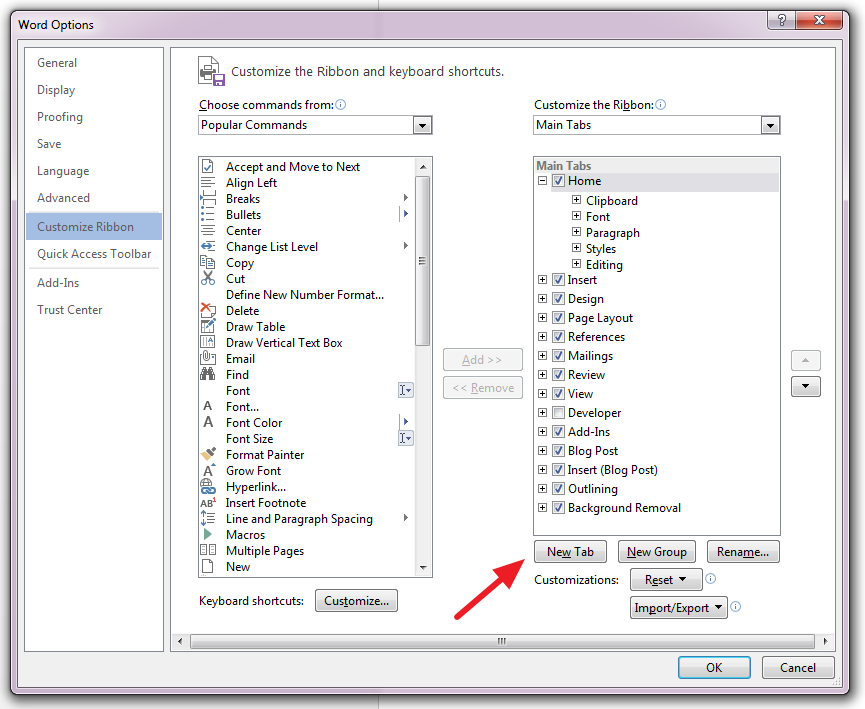
2. In the following dialog, click on New Tab.

Creating New Tab

To label it, right click on it and select Rename. Click on OK

3. Next, create a group to organize your commands by functionality (eg. Formatting, Editing, etc.). To do this, click on New Group. You can rename and add icons for each group by right clicking on it and selecting Rename. Do this for each group you want on your tab.

Creating New Group

Now you can start adding commands to them.

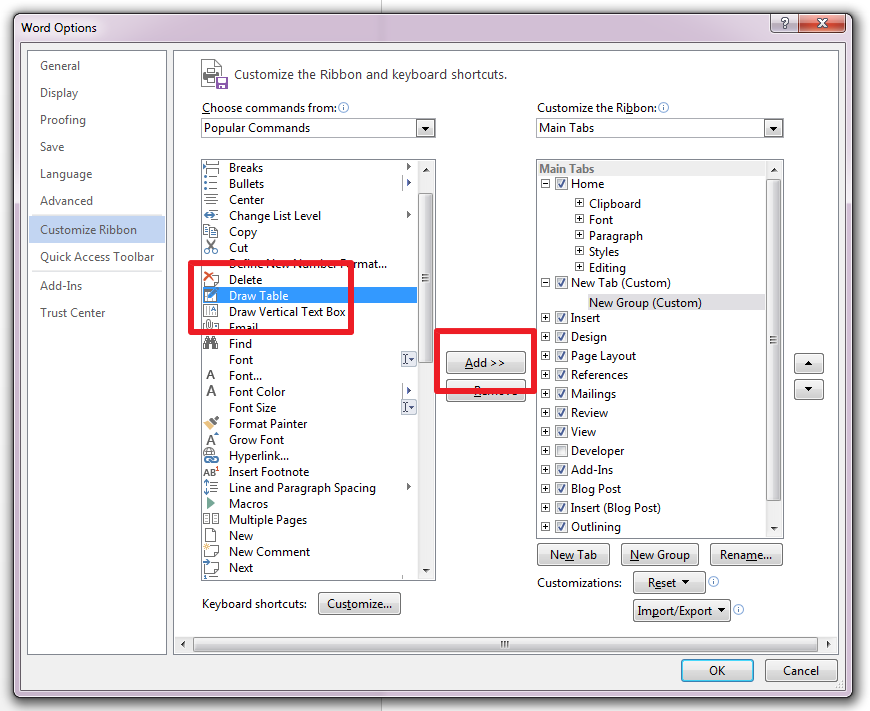
4. To add commands to a specific group, ensure that the group is selected and highlighted. Then in the Choose Commands from column, find and select your favourite command. Click on Add. Or you can drag and drop the command directly into the group. Repeat this for every command you want to include.

Adding Commands to Tab

If you’d like to change the order, simply rearrange them by moving them up or down the list.

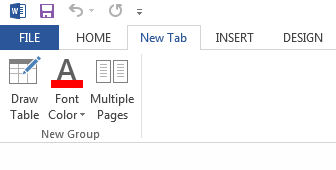
5.  Click on OK when you’re finished and your customized tab will be added to the main Ribbon.

New Tab in Ribbon

There are a number of ways to get Microsoft Word customized to your liking. Getting your very own tab set up is one of the easiest ways to do it. What other ways do you have MS Word 2013 tailored to your needs?

How to Attach A PDF File To Microsoft Word Documents

Document Attachment

Digital documents are the number one staple behind any company or workflow.  And everyone shares them whether by email, cloud services, or URL. But do you ever wonder if there’s an even easier way to bundle your documents together? Short answer: yes, there is.

Attaching or embedding PDFs in Word documents can be an even quicker alternative than email attachments. It’s also a dead simple way to combine PDF and Word content together.

Think of PDF documents that contain file attachments. You have everything you need in that one single file and there’s no need to go back to the email for the other attachments.  Doing the same with a Word document can be just as convenient. It can be helpful in situations where you need to:

  • Attach legal PDF documents as an appendix
  • Quickly access PDF forms, reports, contract terms, or brochures
  • Provide extra working drafts or updates to colleagues in business  proposals
  • Access or provide PDF resources as reference for papers you’re writing

Embedding a PDF document within MS Word is a popular and sought-after tip. With digital documents becoming more important these days, it’s a handy and helpful method to keep in mind.

To keep highly related PDF and Word files neatly together, follow these steps:

In Microsoft Word, place your cursor where you’d like the PDF to be located. Then,

1. Go to the Insert tab > Object.

Selecting Insert Object

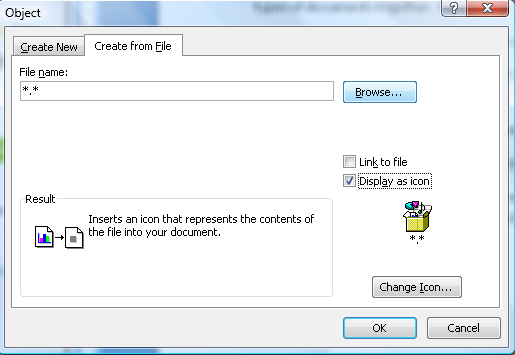
2. In the Object dialog, go to the Create from File tab

Embedding Object Word Document

3. Click on Browse. Search and select the PDF file you wish to embed.

4. Select Display as icon and leave Link to file unchecked. You can choose to change the icon if you wish.

5. Click on OK.

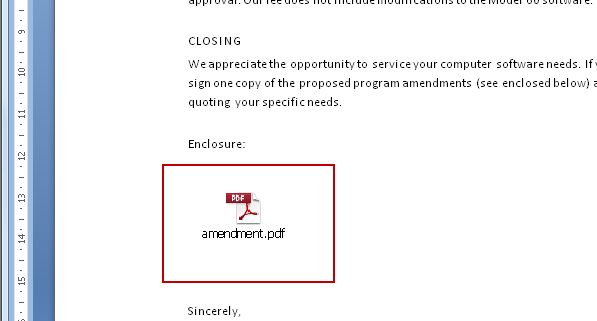
PDF Embedded Word File​

As you can see, the PDF appears right inside your Word document, and can be opened in your PDF viewer of choice. Know of any other methods for combining Word and PDF files together? Let us know!

AutoCAD Tip: Recover Vector Graphics and Text Locked in PDF

As a professional AutoCAD designer, you can deal with any number of CAD drawings on a daily basis that need your attention.  Yet the review process might not always be in an easy, straightforward manner.

The work process is always a collaborative one, and chances are that the people you deal with do not have AutoCAD but some other CAD application that is not able to read AutoCAD’s native DWG format.

To help bridge that gap, professional drafters and designers have, for the most part, resorted to a secondary, more reliable alternative:  the PDF format. You and your clients or colleagues may both be transmitting CAD drawings via PDF to collaborate back and forth on them.

AutoCAD PDF in Able2Extract

Whether these CAD drawings are complex floor plans newly converted to PDF or older archived product designs, the format ensures that both of you can see those CAD drawings as intended, uncompromised.

Yet further on in the workflow, these CAD designs will need modifications, corrections or adjustments before any design plan is finalized.  However, the PDF is a locked down format that makes those vector graphics and text uneditable. You would have to convert the PDF file to a format in order to make any improvements or edits on it.

Able2Extract: PDF to AutoCAD Converter

Our Able2Extract PDF converter is a tool which can accomplish that. As a PDF utility, it is a swiss army knife of PDF converters. It can convert PDF data into more than 10 different formats—AutoCAD included. With it, you can recover vector graphics and text that are locked in PDF.

Though dealing with CAD files may be complex, the conversion method is simplified down to 4 steps:

1. Open the PDF in Able2Extract

Open File Command

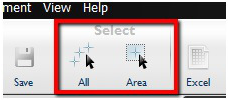
2. Select the graphics and text you need to convert with the All or Area selection commands

Selecting content

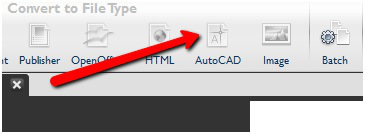
3. Click on the AutoCAD icon on the command toolbar.

Converting PDF to AutoCAD

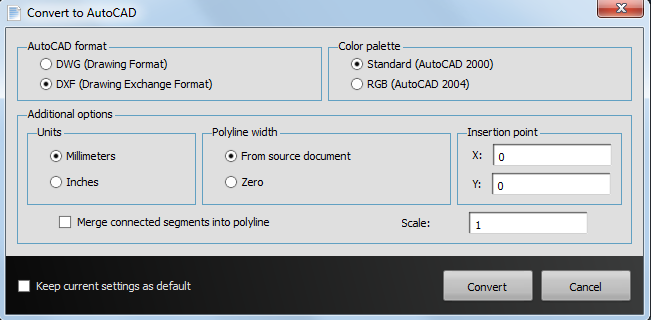
Able2Extract will then let you customize your output.  When you select the PDF to AutoCAD conversion command, you are presented with these CAD specific settings:

Able2Extract AutoCAD Conversion Options

You can select DWG (or DXF, if needed) as your conversion output, adjust the color palette, unit measurements, polyline width, and insertion point.  You will also be able to keep those same conversion settings as a default if needed.

4. Click on Convert and save your file to your computer.

Once the conversion is done, you can make any required edits to the recovered vector graphics and text in AutoCAD, continuing on with the review and drafting process.  As an intermediary software program, Able2Extract extracts your CAD content into layers you can easily work with.

Able2Extract PDF Converter is compatible with Windows, Mac and Linux (Ubuntu and Fedora) platforms. You can test Able2Extract’s PDF to AutoCAD conversion feature with the 7-day free trial. A full version license can be purchased from our website, as well,  for $99.95 or you can opt for the more flexible 30-day subscription for $34.95.

3 Tips On How To Use Excel For Calculating Taxes From PDF Data

Calculating-Taxes-Excel Photo Credit: gonzalo_ar via photopin cc

Tax season rolls around every year and with it comes the head ache of getting organized. It means digging up year old statements and revisiting your ledgers, which is a daunting task in itself. Even worse, if you’re a procrastinator, it may mean the added stress of finding walk-in tax centres booked solid, forcing you to take the DIY approach.

Admittedly, doing taxes yourself can be risky. But user-friendly tax software and speedy e-filing methods are incentive enough to make the attempt. Getting the numbers right is what matters most.  For that, there’s Microsoft Excel, one of the handiest tools for calculating and dealing with complex data.

If it’s your first time doing your taxes online, we’ve got a few important pointers that can make working with taxes and Excel easier for you.

1. Insert, Adjust And Calculate Your Tax Data In Spreadsheets 

Tax CalculatorPhoto Credit: Jorge Franganillo via photopin cc

First off, to calculate your income taxes, you first need to calculate your taxable income. To do this, convert your financial data into Excel so you can work in your applicable deductions, credits, and exclusions using Excel formulas and functions. They can seem scary and complicated, but once you get the hang of them, they are invaluable!

Second, because all invoices and tax deductible receipts are different, you want to ensure that your converted data is properly adjusted and laid out.  If you’re calculating your federal income tax using tables in Excel, your results depend on where the data is placed. Thus, correctly inserting disparate data from the start will help prevent major calculation errors.
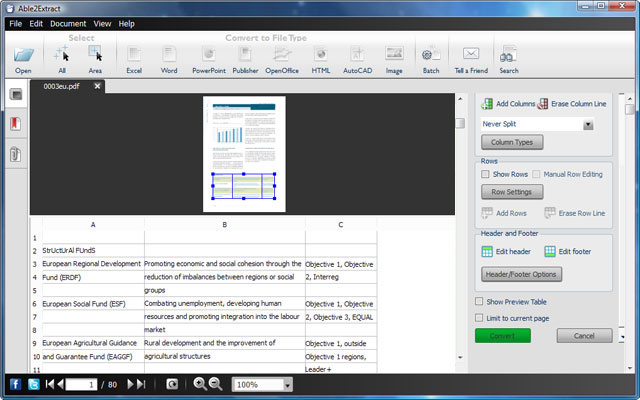
Able2Extract Excel Preview Panel A custom PDF to Excel conversion though can fix the alignment of cells and their data just where you need them. Able2Extract lets you manually move the row and column lines and even give you a preview of how the data will look in your spreadsheet.

2. Use Separate Worksheets For Data Calculations

Every tax filing is different and depending on your situation you may need to use supplemental tax forms and schedules. You may also need other tools, like updated tax tables or the tax computation worksheet from the 1040 US tax return instructions.  So consolidating your data where needed can be an efficient way to stay organized.

Excel Worksheet Names

Every tax form, calculation, or schedule requires special attention. Consequently, you may want to use separate worksheets for different schedules or forms. This way you can set each one up with defined formulas for calculating specific data.

This has a lot of convenient benefits. Each year, you can go back to the same worksheet and just drop your updated numbers in. If you need numbers from different PDF statements, you can convert the relevant data into the same worksheet using Able2Extract.
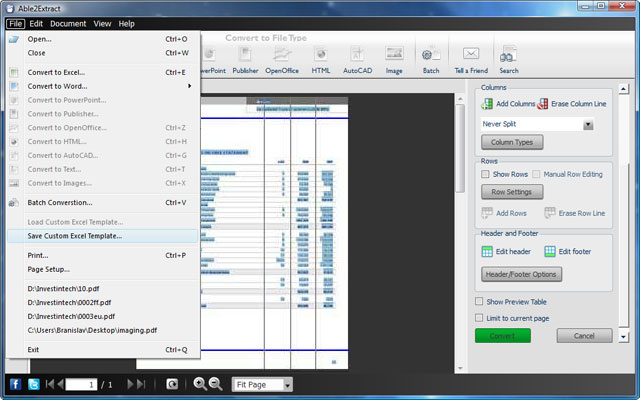
Able2Extract Custom Excel TemplateMoreover, its custom Excel template feature, you can set up your Excel conversion once, save it as a template (seen above), and use it on next year’s PDF statements, which, more than likely, will be formatted with the same layout.

3. Keep Data Formatting Consistent 

Consistent Data FormattingPhoto Credit: Jorge Franganillo via photopin cc

If you use different Excel formatting due to language and cultural preferences (commas for decimals or pound signs instead of dollar signs, for instance), you should make sure that all notations are consistent to avoid misinterpretation. Fortunately, Microsoft Excel is highly specialized in formatting and manipulating data.

To fix the formatting in Excel, you can use the Sort & Filter and Data Tools section in the Data tab or the Numbers and Editing sections in the Home tab.  To do this even more efficiently, reformat your PDF data even before it even reaches the spreadsheet. With PDF receipts and records, you can change the notation and formatting during the PDF to Excel conversion.  
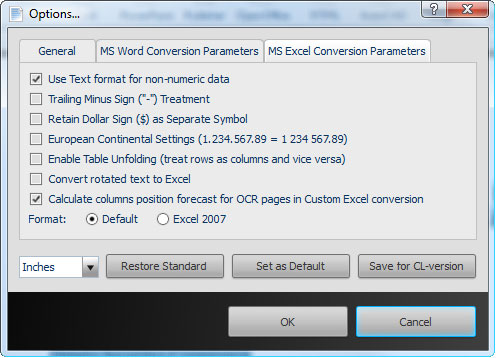
Able2Extract Excel Conversion Parameters

Using the MS Excel conversion parameters in Able2Extract will adjust your data to fit the format you want to use in your spreadsheet, like whether or not to replicate the fonts from the PDF. Retain the dollar sign as a separate symbol, use European continental settings, or treat rows as columns and vice versa.
How Able2Extract Works With Your Document Management System

Document-management-able2extract

In the world of technology, there’s no escaping the digital document and everything that comes with it—the PDF format included.  Professionals with all sorts of working backgrounds have at one point or another dealt with the file format.  No doubt, leveraging a system that can handle a mass number of PDF files effectively is at the top of every company’s list.

Document Management Systems

As a solution, your company probably relies on a central document management system that allows employees to access and share multiple files effortlessly. It can be implemented internally through a corporate server or externally through third party services.

Both methods, of course, have their advantages. Where enterprise server systems allow for secured control access and monitoring, third party systems can be more resource efficient. In either case, you have a digital filing cabinet that can store documents, spreadsheets, and more importantly PDF files.

Uses Of The PDF format

The advantages of PDF documents has evolved drastically over the years, providing users a secure and professional solution at the document level. It already plays a major role in every department:

  • Accounts Payable and Receivable: PDFs are used for handling key documents including invoice exporting, distributing contracts, and accessing pre-purchase documents.
  • Sales and Purchasing: Agents keep records of purchase orders, send out registration forms, and collect and process data for the company.  All are kept in the PDF format.
  • Marketing:  Distributing brochures, product literature, and information to clients.
  • Customer Service: Managing client information, customer accounts, billing and receipts.
  • B2B Correspondence:  Discussing important documents in review, distributing company forms, and exchanging business proposals in secured PDF files.

It’s apparent that PDF files can cause difficulties between departments that, more often than not, work in conjunction with one another.  Thus, employees who need to work with the same stored and trapped content, but in different ways, need to consider how they can do so in an efficient manner.

Able2Extract & Your Document Management System

Think about it. How would you instantly take the PDF data your department needed, edit it, and integrate it back into the system completely processed and as needed?

Quick makeshift solutions can turn a simple task, like extracting text, into a major problem.  You’ll always need to reformat, realign and rearrange the data, wasting valuable time and resources. With every tool you seek out, you want one that lets you work seamlessly with files and systems already in place.

Able2Extract provides an intuitive way of converting PDF documents, minus the high cost, complex integration, and the steep learning curve. Here’s a closer look at how you can extend your workflow and get the most out of it:

Instant PDF conversion—Spend more time on analyzing data. Conversion is reduced to a 3-step process. Open your file, select the content to convert, click on the conversion output desired.

Content Editing—Able2Extract is designed for general content repurposing in mind. You get conversion options that are suitable to each format, whether it be Word or Excel.

Data manipulation—For professionals in data intensive work environments, Able2Extract can convert only the data you want, not the redundant data you don’t.

Document Collaboration—With more than more than 10 PDF conversion options, Able2Extract eases the document collaboration process and accommodates any format conversion needed by individual workers.

Invoice Data Analysis—Able2Extract’s custom PDF to Excel conversion gives users the control and flexibility to convert and manipulate PDF data at the cell level.

This flexibility enables you to work with information the way you need to and get the most out of your conversions.  For more information, check out the quick start guide to get a closer look at Able2Extract.
photo credit: DijutalTim via photopin cc